
เปลี่ยนตัวชี้เมาส์ใน Windows 7 - ต่อไปนี้เป็นวิธีการ
อ่านเคล็ดลับที่ใช้งานได้นี้เกี่ยวกับวิธีการเปลี่ยนตัวชี้เมาส์ใน Windows 7
เปลี่ยนตัวชี้เมาส์มองเห็นได้ใน Windows 7
- คลิกที่ไอคอน "เริ่ม" หรือ "Windows" จากนั้นคลิกที่ "แผงควบคุม"
- ตอนนี้เลือกหมวดหมู่ "ฮาร์ดแวร์และเสียง"
- ใต้ "อุปกรณ์และเครื่องพิมพ์" คลิกที่ "เมาส์" เพื่อเปิดการตั้งค่าเมาส์
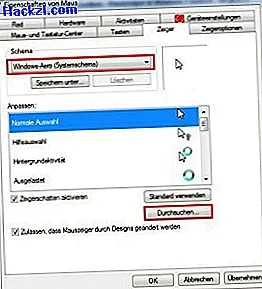
- หน้าต่างที่เรียกว่า "คุณสมบัติของเมาส์" จะเปิดขึ้น ไปที่แท็บ "พอยน์เตอร์" ด้านบน
- ใน "โครงการ" คุณสามารถเปลี่ยนลักษณะที่ปรากฏของตัวชี้เมาส์ได้ ตัวอย่างเช่นตัวชี้เมาส์สามารถขยายตัวอย่างเช่นการเลือกโครงร่าง "Windows Aero (ใหญ่) (แผนภาพระบบ)"
- ในเมนูเลื่อนของ "ปรับแต่ง:" คุณสามารถเปลี่ยนตัวชี้เมาส์สำหรับแต่ละคำสั่ง ในการทำสิ่งนี้ให้คลิกที่คำสั่งก่อนแล้วคลิกที่ "เรียกดู ... " และเลือกตัวชี้ที่ต้องการโดยคลิกที่ "ตกลง"
- บันทึกการเปลี่ยนแปลงโดยคลิกที่ "ใช้"
- คลิก "ใช้ค่าเริ่มต้น" รีเซ็ตการเปลี่ยนแปลงทั้งหมดเป็นการตั้งค่าดั้งเดิม
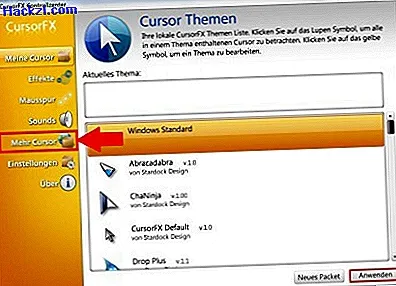
"CursorFX" ให้ตัวชี้เมาส์ของคุณดุร้ายมากยิ่งขึ้น
ด้วยเครื่องมือ "CursorFX" ฟรีคุณสามารถดาวน์โหลดตัวชี้เมาส์ใหม่และเปิดใช้งานได้โดยตรงในโปรแกรม
- ติดตั้งโปรแกรม "CursorFX" และเริ่มต้นหลังจากการติดตั้ง
- พอยน์เตอร์ของเมาส์ที่ติดตั้งไปแล้วจะปรากฏใน "My cursors" โดยคลิกที่ "Cursors เพิ่มเติม" คุณสามารถดาวน์โหลดตัวชี้เมาส์ที่น่าสนใจจากหน้านักพัฒนา
- ด้วยการคลิกที่ "สมัคร" คุณเปลี่ยนตัวชี้เมาส์
อ่านวิธีการเปลี่ยนพื้นหลังเดสก์ทอปของคุณที่นี่